Our 'new look' Home Screen - Displaying the List of Coffees
There are 3 major components (classes) involved in implementing this feature:
CoffeeItem
CoffeeListAdapter
CoffeeFragment
We'll take each class in turn and insert the necessary code to complete this feature of the App.
CoffeeItem
The main purpose of this class is to represent a single coffee row in our custom list, so the first thing we need to do is decide how the row should actually look - the associated layout (coffeerow.xml) is already supplied:
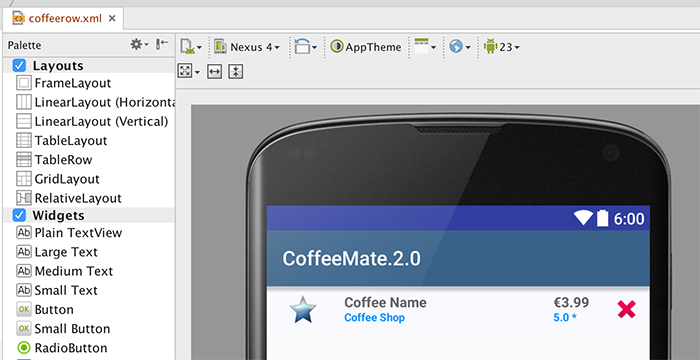
but familarise yourself with the widgets (the 'fields' or Views) as you will need to access them in your code.
Inside CoffeeItem.java you will need to finish the updateControls() method to ensure all the coffee data is displayed correctly. This will involve "binding" to each of the widgets (Views) on the layout and setting their value. You can see how the coffee name widget is set below:
private void updateControls(Coffee coffee) {
        ((TextView) view.findViewById(R.id.rowCoffeeName)).setText(coffee.name);

        // Do the same for shop, rating, price & the favourite image here
        // and set the favourite on/off depending on the coffees favourite value
    }
CoffeeListAdapter
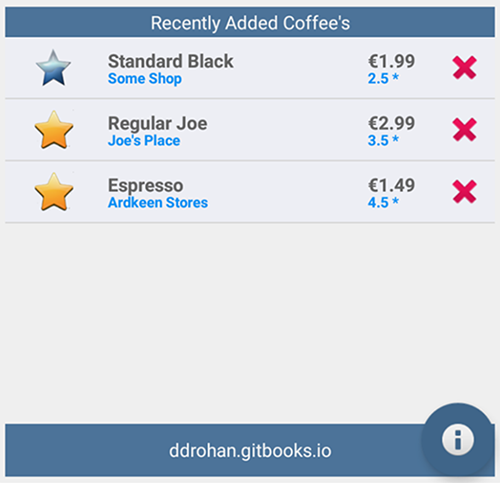
The main purpose of this class is to bind our coffeeList data to a particular view (a ListView in our case) and ultimately display it like so:

It's worth noting that this class is a custom adapter class, and it's the only way we get to display or coffee data in the "custom" format we want (ie our CoffeeItem rows) - if we were to use a standard Adapter, we would only be able to dislay our coffees in a very basic fashion.
To "customise" our adapter, we first say that it will manage Coffee Objects (already done) :
public class CoffeeListAdapter extends ArrayAdapter<Coffee>
{
...
and then override a number of methods:
  @Override
  public View getView(int position, View convertView, ViewGroup parent)
  {
    return null;
  }

  @Override
  public int getCount()
  {
    return 0;
  }

  @Override
  public Coffee getItem(int position)
  {
      return null;
  }

  @Override
  public long getItemId(int position)
  {
    return 0;
  }

  @Override
  public int getPosition(Coffee c)
  {
    return 0;
  }
}
Remember, the getView() method is auotmatically called for every object that exists in the underlying data (ie our coffeeList) so you should be returning a CoffeeItem reference here - try and have a go at this without referring to the notes.
The remaining methods are all related to the coffeeList itself, so again, give it a go without the notes!
CoffeeFragment
The main purpose of this class is to allow us to reuse a component (the Fragment) which contains our list of coffees:
The only thing we need to do at this stage is create an instance of our custom adapter and associate it with our Fragment, so inside the onCreate() method of the fragment insert the following:
    listAdapter = new CoffeeListAdapter(activity, this, Base.coffeeList);
    setListAdapter (listAdapter);
The last thing we need to do is attach this Fragment to the Home Screen, so inside our onResume() method in Home.java you need to insert the following:
      coffeeFragment = CoffeeFragment.newInstance(); //get a new Fragment instance
      getFragmentManager().beginTransaction().add(R.id.fragment_layout, coffeeFragment).commit(); // add it to the current activity
You'll get an error on R.id.fragment_layout so you need to replace the ListView element in content_home.xml with the following:
<FrameLayout
            android:id="@+id/fragment_layout"
            android:layout_width="wrap_content"
            android:layout_height="wrap_content"
            android:layout_above="@+id/footerLinearLayout"
            android:layout_alignParentLeft="true"
            android:layout_alignParentRight="true"
            android:layout_alignParentTop="true" />
Build your project and if you run your app again you should see your list displayed on the Home Screen like so (with a small bug to fix!) :
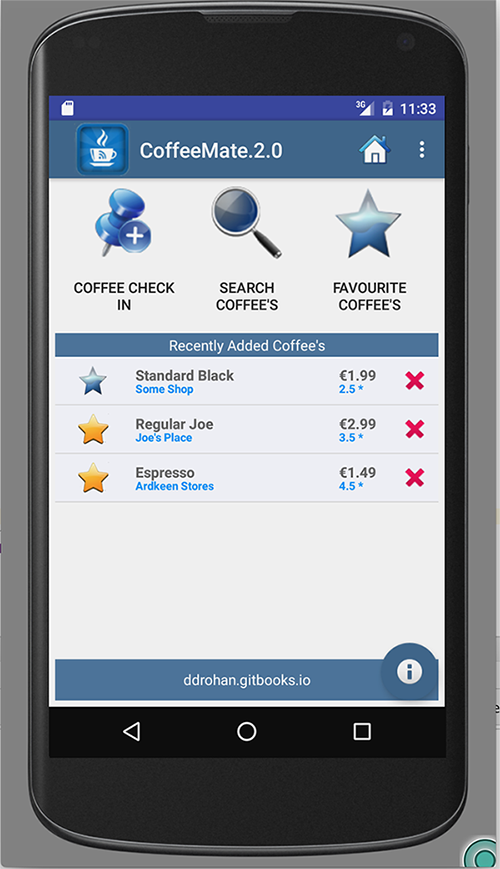
and you should be able to "Add a Coffee" so make sure to check this functionality. On a related note, you've probably noticed your list 'duplicates' the data, so it's worth removing the setupCoffees() method, now we know our 'Add' works.
However, if you select a row in the list, or select the 'delete' button, nothing happens - that's the next step.